
Getting Started with Home Assistant on a Mini PC
A complete walkthrough for installing Home Assistant on a mini PC or x86 hardware, setting up Zigbee devices, integrations, and HACS. Companion article to the full video guide.
This is the companion article to my full video walkthrough above. If you're not sure what Home Assistant is, check out my What the heck is Home Assistant?! video first. Home Assistant has a bit of a reputation for being intimidating, and to be fair, it's kind of earned that reputation over the years. But it's getting easier all the time, and it's damn close to being ready for prime time. The biggest hurdle is still just getting the thing installed, especially if you want to run it on your own hardware instead of buying a ready-made box.
So let's sort that out. We're going to take a completely blank mini PC and get you all the way to a working smart home with Zigbee devices, integrations, and the Home Assistant Community Store.
What You'll Need
Before we dive in, gather your kit:
- A mini PC — I'm using a Beelink 16GB SER5, but any x86 PC will do (here's a cheaper option that'll work just fine). You can even use a full desktop, though it'll draw more power.
- A USB flash drive — at least 8GB. Shop around though, sometimes larger capacity ones are actually cheaper for some reason.
- An Ethernet cable — you can use Wi-Fi, but wired is more reliable and Home Assistant themselves recommend it.
- A monitor, keyboard and mouse — only needed during install. Once everything's running, you do it all from the browser. If you do a lot of systems work, a little wireless keyboard like the Rii X8 is really handy to have around.
- A Zigbee coordinator — we'll cover this later, but I recommend the Sonoff ZB Dongle E.
- Another computer — Mac, Windows, Linux, doesn't matter. You'll need it to flash the USB drive.
I'd also recommend downloading the Home Assistant companion app on your phone — we'll use it later on.
One important warning: installing Home Assistant will completely wipe whatever is on the PC. If yours came with Windows or you've got anything on there you need, back it up first. You can run Home Assistant alongside another OS using Docker, but that's out of scope for this tutorial.
What About Raspberry Pi?
If you'd rather use a Raspberry Pi (though I'd say they're a bit too expensive to be worth it these days), the process is actually much simpler. You don't need to go through the Ubuntu intermediate step described below. Instead:
- Download the Home Assistant OS image for your Pi model from the Home Assistant installation page.
- Flash it directly to a microSD card (32GB minimum) using Raspberry Pi Imager or Balena Etcher.
- Pop the card into your Pi, plug in power and Ethernet, and boot it up.
- After a few minutes, navigate to
http://homeassistant.local:8123in your browser and you're in.
No Ubuntu, no disk restore, no BIOS fiddling. It just works. If you want something even simpler, the Home Assistant Green comes with everything pre-installed — you literally plug it in and go (you'll still need a Zigbee dongle though).
For everyone else using a mini PC or x86 hardware, read on.
Step 1: Flash Ubuntu to Your USB Drive
Because I'm on macOS, I'm using Balena Etcher for this. If you're on Windows, Rufus works just as well.
-
Download Ubuntu Desktop. Depending on your connection, this might take a while.
-
Open Etcher, select the Ubuntu ISO, select your USB drive, and click Flash.
-
It'll ask for your system password — this is just because it needs permission to write to a disc.
This process usually takes a few minutes.
While the flash is running, get your mini PC set up: plug in power, Ethernet, keyboard and mouse. Don't plug in your Zigbee dongle yet — we'll do that later.
Step 2: Boot Into Ubuntu
Once the flash is done, pop the USB drive into your mini PC and switch it on.
You'll probably need to get into the BIOS to boot from USB. The trick is to turn the machine off, turn it back on, and keep tapping the Del key (sometimes it's F1 or F8 — Google your specific model's BIOS key if you're unsure).
Once you're in:
- Make sure UEFI boot mode is enabled.
- Either change the boot priority to put the USB drive first, or use the boot override option to boot from it directly.
When the Ubuntu installer loads, select "Try Ubuntu" — not "Install Ubuntu". We're just using Ubuntu as a stepping stone to get Home Assistant onto the machine.
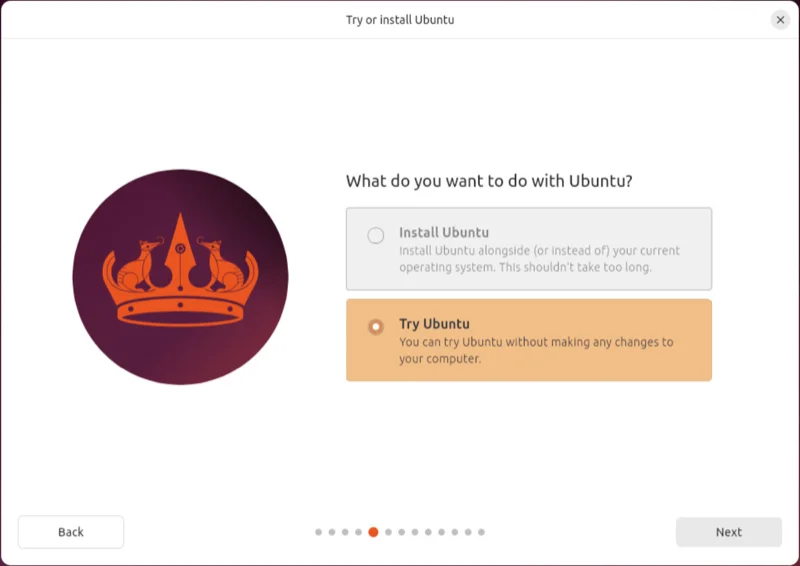
I know, it's a ridiculously convoluted process. I don't know why Home Assistant does it this way, but it is what it is.
Step 3: Install Home Assistant OS
Now that you're in Ubuntu's live environment:
- Open Firefox and go to the Home Assistant x86-64 installation guide.
- Scroll down to "Install Method 1" and download the image.
- Open the Disks app (click "Show Apps" and search for "disk").
- Select the main internal drive, click the three dots menu, and choose Restore Disk Image.
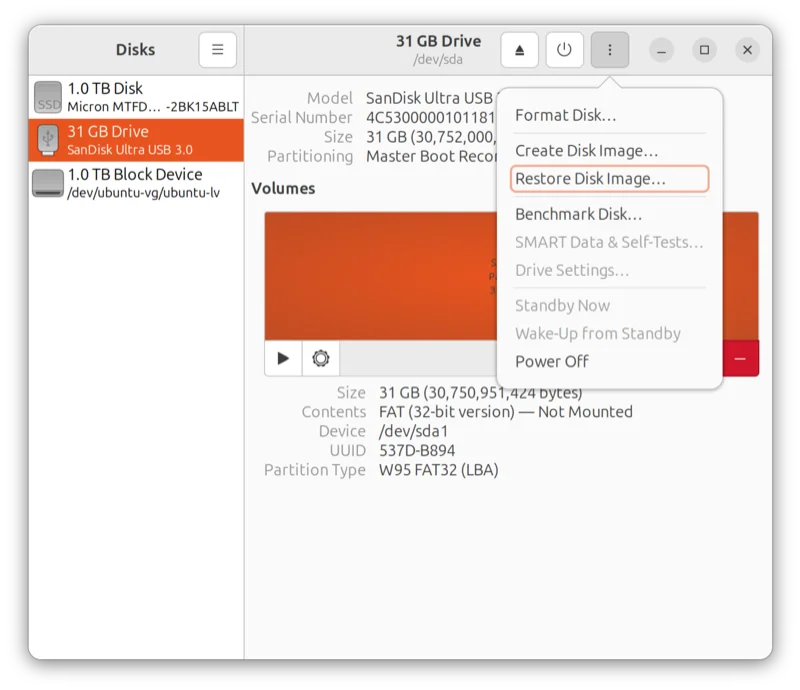
- Select the Home Assistant image you just downloaded.
Last warning: this will wipe the machine. Make sure there's nothing on there you want to keep.
Click Start Restoring, then Restore. It'll ask for authentication — since you're just trying Ubuntu and haven't set a password, just click Authenticate.
Once it's done, shut down the machine, remove the USB drive, and you're finished with the fiddly bit. You don't need the monitor, keyboard, or mouse anymore. All you need now is power and Ethernet.
Step 4: Initial Setup
Reboot the device and head to your browser on another computer. Try http://homeassistant.local:8123 — that should work on most networks. If it doesn't, you'll need to find the device's IP address from your router.
You'll see a preparation screen that takes a minute or two, then the "Create My Smart Home" button will appear.
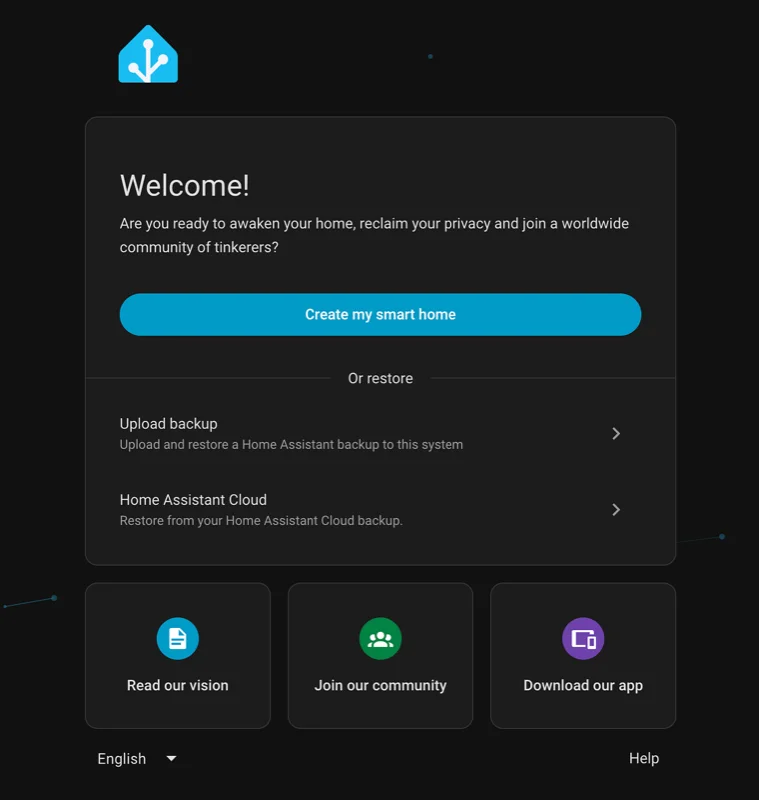
- Create your user account with a strong password.
- Set your home address (this is used for location-based automations like sunrise/sunset triggers).
- Choose your analytics preferences — this sends data to Nabu Casa to help improve the product. It's optional and entirely your call.
- Home Assistant will show you devices it's already found on your network. You can set these up now or come back to them later.
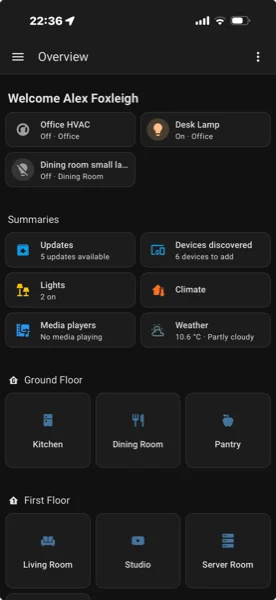
Step 5: Set Up Areas and Zones
Home Assistant lets you organise your home into floors, areas (rooms), and zones. This is really handy for targeting automations.
It comes with living room, kitchen, and bedroom by default. I'd recommend creating floors first (ground floor, first floor, etc.), then creating your actual rooms and assigning them to floors.
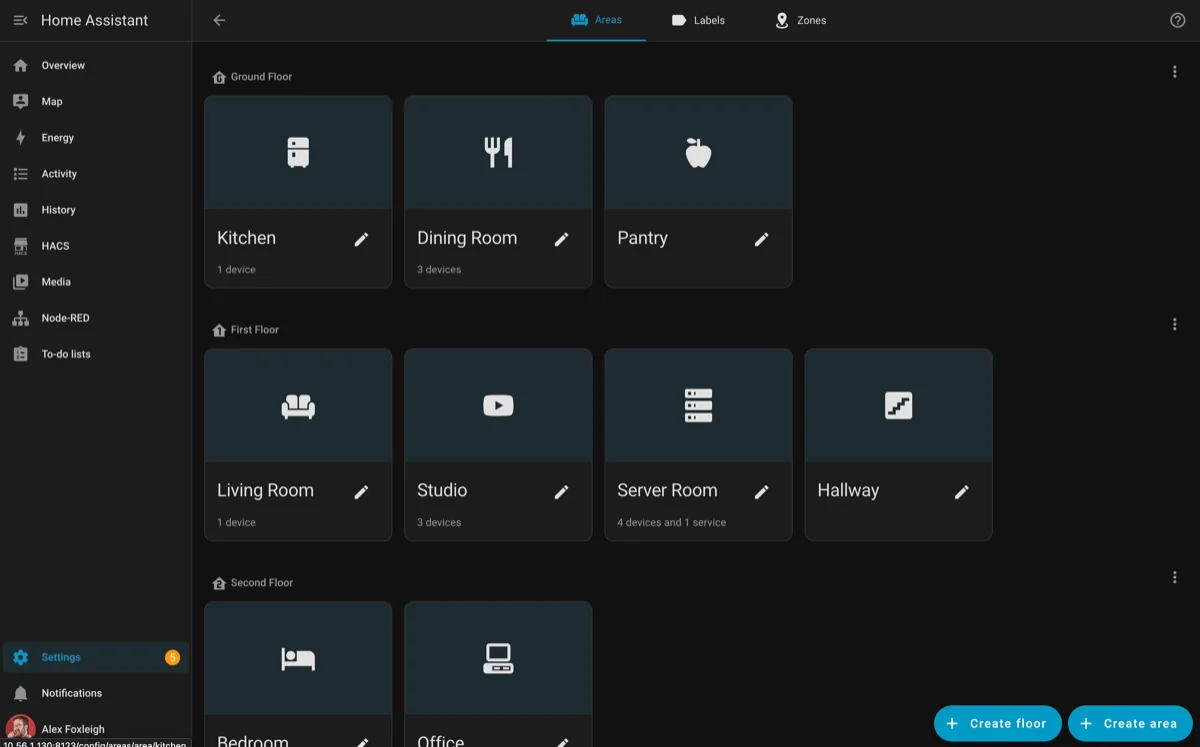
Zones are for location-based automations outside your home. Your home zone is set up automatically. You can add others like "Work" — just drop a pin on the map. This used to be really painful to set up, but now it's dead easy.
Step 6: Add Your Zigbee Coordinator
Time to plug in the Zigbee dongle. I recommend the Sonoff ZB Dongle E — it's dirt cheap and works brilliantly.
Top tip: don't plug it directly into your machine. Use a USB extension cable instead. USB ports (especially USB 3) are electrically noisy and can interfere with the Zigbee signal. A short extension cable gives you better range and less interference.
As soon as you plug it in, Home Assistant should detect it automatically under Settings > Devices & Services. Click Add, select Set up automatically, give it a name, assign it to your server room area, and you've got a working Zigbee network.
Step 7: Pair Your First Devices
Let's pair a couple of devices. I'm using an older IKEA Zigbee button and an IKEA Zigbee bulb, but any Zigbee device will work.
Pairing a Button
- Go to your Zigbee coordinator in Devices & Services and click Add Devices via This Device.
- Put batteries in the button and trigger pairing mode (for the IKEA button, tap the pairing button four times).
- Home Assistant will interview the device — basically figuring out what it is and what it can do.
- Give it a name and assign it to a room.
Pairing a Bulb
The pairing process varies by manufacturer — Google your specific bulb model plus "pairing process" and you'll find instructions. For older IKEA Zigbee bulbs, you turn them on and off about eight times until they blink.
Note: newer IKEA bulbs are Matter/Thread, not Zigbee. They won't work with this setup out of the box. The Zigbee IKEA stuff is getting hard to find now, but there are great alternatives — I'd recommend the Innr E27 Zigbee bulbs and the Sonoff Zigbee button as solid replacements.
Step 8: Create Your First Automation
With a button and a bulb paired, let's make them talk to each other.
Go to Settings > Automations & Scenes > Create Automation > Create New Automation.
For "turn on":
- When: Device > your button > "Turn on is pressed"
- Then: Device > your bulb > Turn on
Save it, then create a second automation for "turn off" using the same pattern.
This is just scratching the surface. Home Assistant supports automations across Wi-Fi, Zigbee, Thread, Bluetooth, and hundreds of integrations.
Step 9: Install HACS (Home Assistant Community Store)
HACS used to be a pain to set up, but it's much easier now.
- Go to Settings > Add-ons > Install Add-on.
- Click Repositories and add the HACS repository URL from hacs.xyz.
- Search for HACS and click Install.
- Enable Start on Boot and click Start.
- Check the log tab — wait for the line that says "remember to restart Home Assistant before you configure it".
- Go to Settings > System and restart Home Assistant.
- After restart, go to Settings > Devices & Services > Add Integration and search for HACS.
- You'll need a free GitHub account to authenticate — HACS uses GitHub to fetch community integrations.
HACS gives you access to thousands of community-made integrations for devices and services that aren't officially supported yet. They're community-vetted and generally safe, though they are technically "use at your own risk".
Step 10: Try an Add-on (Node-RED)
The add-ons system is one of the big advantages of installing Home Assistant OS the way we did (as opposed to Docker, which doesn't include the Supervisor).
A great example is Node-RED (what the heck is Node-RED?), which is my preferred way to build automations:
- Go to Settings > Add-ons > Install Add-on and find Node-RED.
- Install it, enable Start on Boot and Show in Sidebar.
- If it doesn't start, go into the configuration and turn off the SSL option (this is fine if your instance isn't exposed to the internet).
- Start it, and you'll see Node-RED appear in your sidebar.
Step 11: Set Up the Mobile App
Open the Home Assistant companion app on your phone, tap Connect to My Home Assistant, and it'll search for instances on your network. Log in with the account you created earlier.
Your phone gets added as a device, which means you can use it for location-based automations and receive notifications. You can also control all your smart home devices from the app.
Step 12: Add an Integration
Home Assistant will have already discovered a bunch of devices on your network — smart TVs, Apple TV boxes, streaming devices. You can set these up anytime from Devices & Services.
As a quick example, I set up the Met Office integration (the UK weather service). You'll need a free API key from the Met Office DataHub website. The Home Assistant docs walk you through the whole process — whenever you see a question mark icon in the UI, click it and it'll take you straight to the relevant documentation.
Alternative Zigbee: Zigbee2MQTT
You don't have to use Home Assistant's built-in Zigbee (ZHA). There's an alternative called Zigbee2MQTT which is more advanced. It's not necessarily better — ZHA is perfectly fine — but some devices work with Zigbee2MQTT that don't play nicely with ZHA. If you hit issues, it's worth looking into.
You've Done the Hard Part
And that's it. You've now got Home Assistant running on your own hardware, a Zigbee coordinator talking to your devices, a few integrations set up, a mobile app, and everything runs locally. No cloud required (apart from any internet-based integrations you specifically choose to add).
Home Assistant has had a reputation for being a power user option for a long time. It still is, but you've just done the hardest bit. Everything from here — adding devices, building automations, customising dashboards — is honestly not all that different from using something like the Aqara app or Apple HomeKit.
And the best part? This is all yours. Nobody can turn it off, pull the rug from under you, or change the terms of service, because everything runs locally. The only things that touch the internet are the ones you've specifically chosen to allow.